AIF2APD is integrated into APD It is launched from the ASM333 menu pulldown. You should be starting from an "empty" drawing because AIF2APD will be creating your die component and BGA component and the required padstacks.

|
AIF2APD is integrated into APD It is launched from the ASM333 menu pulldown. You should be starting from an "empty" drawing because AIF2APD will be creating your die component and BGA component and the required padstacks. |
|
Selecting the AIF FileWe assume you have received an AIF file from someone or created your own. Use this dialog box to find and select the file you want to import. Hit OK and the import process will start. |

|
The Import ProcessThe AIF file is scanned and then the import process begins. Padstacks are built from the list of pads in the AIF file. Then a die component will be built by extracting the die pad coordinates, padstacks and outline. Then the BGA component will be built in the same fashion. Tthe netlist is imported and both components are placed. Bond fingers and wires are placed. Rings are built and drawn. Finally the bond fingers properties (finger numbers) are added. |

The entire process takes about a minute for a large BGA design. You can watch it proceed. When complete you will see a log file that summarizes both the results and reports any errors. |
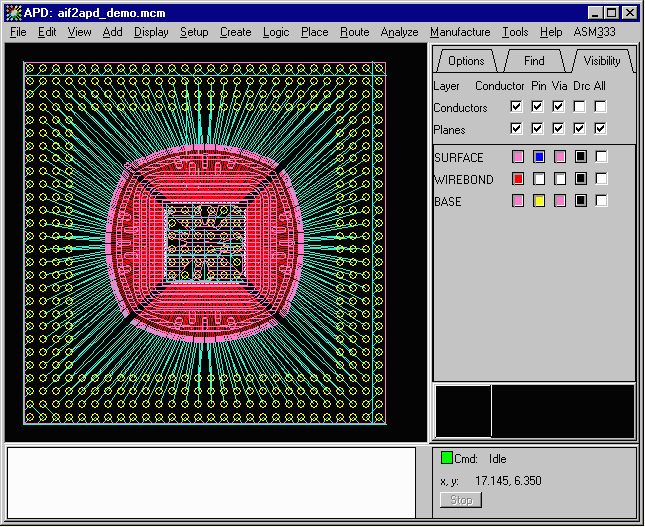
The Imported DesignBelow you can see the data imported for this example. The import is completely intelligent - each bond finger is a via, the balls are pins in the BGA component, the die pads are pins. Each piece of ring has the correct net assigned. You will probably need to update the padstack definitions to allow for your stackup as the importer has no way to know how many substrate layers there are. But once that is done you are ready to route the design. See the same circuit with the ratsnest turned on. 
|