
 |

|
|
No matter how powerful your design software may be, you must eventually create a photoplot file in Gerber format to create film. Aggravation can be reduced by better understanding what is contained in a photoplot file. Misunderstandings between the PCB designer and photoplot operator account for a large percent of the bad film produced in this industry. |
|
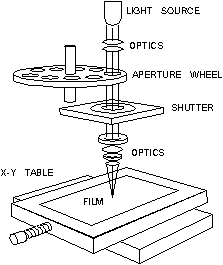
Before diving into the details of the photoplot file a short discussion of photoplotters will make the following material easier to digest. Early photoplotters consisted of a precision servo controlled X-Y table to which a piece of high contrast film is attached. A bright light source is directed through a shutter, through an aperture wheel and focused onto the film. A controller converts Gerber commands into the appropriate table movements, wheel rotation and shutter opening. |
 |
Figure 1 - Photoplotter Schematic When the shutter is open light shines through the aperture exposing the aperture's image onto the film. When the table simultaneously moves while the shutter is open, a line or stripe is imaged onto the film. Given the proper commands for table motion, aperture selection and shutter operations, one can construct just about any image on film. |
|
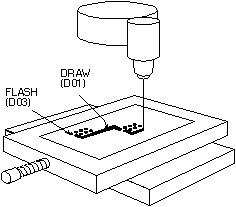
Figure 2. Plotter Operation |

|
Simplicity: A double-edged swordThe beauty of the Gerber database is its simplicity. There are only four essential commands plus coordinate data. The database had to be simple and compact because the first machines were driven by a fragile punched paper tape. The need to compress as much information as possible into as few bytes as possible explains many of the "problems" we encounter today when storage space is measured in hundreds of megabytes instead of hundreds of bytes. |
But simplicity exacts its own price. The Gerber file lacks essential information necessary to run the plotter. This missing data is handed from the designer to the plotter operator separately, and is often the source of errors. Further, the temptation to create non-standard extensions is impossible to resist. Every photoplotter manufacturer supports the basic Gerber commands plus whatever features they feel necessary to differentiate their machine. The result is that one man's feature is the next man's unsupported problem. |
Gerber File ContentsBelow is a simple Gerber file illustrating the structure and content of the format: |
||
G90* 1 G70* 2 G54D10* 3 G01X0Y0D02* 4 X450Y330D01* 5 X455Y300D03* 6 G54D11* 7 Y250D03* 8 Y200D03* 9 Y150D03* 10 X0Y0D02* 11 M02* 12 |
The line numbers at far right are not part of the file. Examining this file without any prior knowledge of Gerber one would correctly deduce that each line represents a particular machine command and that the asterisk (*) is the end of command character. There seems to be different kinds of commands: instructions beginning with G, D, M and x,y coordinate data. |
|
G-Codes: Setting the Initial ConditionsGerber calls the Gxx commands preparatory codes. In most cases these codes are used to prepare the machine's state prior to drawing. Several G codes are important to recognize: G90/G91 Incremental vs. Absolute Coordinates |
||
|
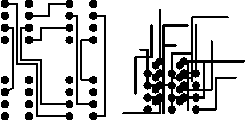
The G90 command in line 1 tells the machine that data coordinates are absolute. Each set of coordinates is referenced to the table's origin (0,0). The converse to absolute is incremental -- each coordinate is measured relative the previous coordinate value and is set by issuing the G91 command. You may never encounter the G90 command in any Gerber file since most programs assume that absolute coordinates are the default and do not bother to write the G90 command. What's worse is that many incremental databases don't bother to use the G91 command either. If you see a "starburst" display similar to figure 3 on your CAM station you are probably trying to read a file written with incremental coordinates. |

Figure 3 Left: correctly displayed. Right: Viewer set to incremental when data is absolute. |
|
|
G70/G71 Inches vs. Millimeters The G70* (line 2) indicates that data following is in units of inches. This is another G-code that rarely appears in Gerber files. In the U.S. one assumes that Gerber files are output in inches, but files generated in the rest of the world may be in inches or millimeters. G71 indicates units of millimeters. Tool Select G54 G54, tool select, (line 3) is the most commonly encountered G code and instructs the plotter to rotate the aperture wheel to the position described by Dxx immediately following the G54 command. If you find no G54's in a particular file don't panic. G54 is an optional command on many photoplotters; some programs don't use it and the photoplotter recognizes that by specificity Dxx (where xx is not 01,02,03) that the correct tool should be selected. Draw and Flash Commands D01, D02, D03 D-codes are instructions to the photoplotter that naturally include the letter "D." The first three D-codes control the movement of the x-y table.
D01 (D1): move to the x-y location specified with the shutter open.

D02 (D2): move to the x-y location specified with the shutter closed.

D03 (D3): move to the x-y location specified with the shutter closed;
          then open and close the shutter -known as flashing the exposure.
D01 is the command that "draws" lines. D02 is the command to move the table without exposing any film. D01 and D02 correspond to moving the paper on a pen plotter with the pen down and pen up. D03 is the "flash" command. The table is moved with the shutter closed. When the desired x-y coordinates are reached the shutter opens and closes leaving the image of the aperture on the film. The flash instruction is an efficient way to image the thousands of pads present on most circuit boards. D01, D02 and D03 commands follow their coordinate data. For example the following sequence of commands: X0Y0D02* X450Y330D01* X455Y300D03* would move the table position to 0,0 with the shutter closed and then would draw a line from 0,0 to 450,330. A flash would be located at 455,300. |
Wheel Positions/Apertures D10-D999Unlike D01, D02 and D03 the D-codes with values from 10-999 are data, not commands. They represent apertures or positions on the photoplotter's wheel. Early photoplotters used a wheel with 24 positions. Each slot is filled with a piece of film. The wheel rotates, positioning the desired aperture in the light path. Table 1 shows the correspondence between D-code and aperture position. |
Table 1. D-codes vs. Apertures
D-code Aperture   D-code   Aperture
       Position            Position
  10       1        20        13
  11       2        21        14
  12       3        22        15
  13       4        23        16
  14       5        24        17
  15       6        25        18
  16       7        26        19
  17       8        27        20
  18       9        28        21
  19       10       29        22
  70       11       72        23
  71       12       73        24
|
One can see that it proceeds logically from D10 through
D19. Then, instead of D20 mapping into position 11, D70
and D71 intrude. The mapping continues, now skewed by
two places until reaching the point where one would expect
to see D30. Instead D72 and D73 jump in. Most photoplotters
and CAM software ask you to enter the aperture descriptions
by D-code; a few reference by aperture position. |
|
Miscellaneous M Codes At the end of the file we see the command M02*. Gerber calls the M codes, miscellaneous codes. The only common M-code used is at the end of the file- M00, M01 and M02 which are all different types of program "stop" commands. Occasionally one sees an M02 at the beginning of a Gerber file. Apparently some applications issue this to insure that any previous file running is stopped - however many CAM softwares see the M02 at the beginning of the file and ignore anything following it. |
X,Y Coordinate DataCoordinate data makes up the bulk of the Gerber file. It is difficult to manually follow table motion from a printout because Gerber uses several techniques to minimize the number of bytes required to represent the data. These are:
|
|
Decimal Point Suppression
The decimal point is redundant if you know in advance where it will be. The decimal point needs to be reinserted by the photoplotter control software in the correct location. One of the most common errors that novice designers make is to assume that the person receiving their data knows you data format. Consider the following Gerber commands: X00560Y00320D02* X00670Y00305D01* X00700Y00305D01* The table moves along X from 00560 to 00670 during the first two commands. But what does 00560 represent? It could be 5.6 inches, 0.56 inches, 0.056 inches or even (but not likely) 0.0056 inches. No way to tell. If the designer tells you that there are two integers before the decimal point and 4 integers after the decimal point then you know that 00560 represents 0.56 inch. |
|
Leading and Trailing Zero Suppression The designers of the Gerber database didn't rest after eliminating the decimal point. They must have looked at a printout and thought, "What good are all those extra zeros in front? suppose we cut them off. You can still figure out the coordinate value if you count decimal points from the right side of the number."
           No Zero                    Leading Zero
          Suppression                  Suppression

          X00560Y00320D02*             X560Y320D2*
          X00670Y00305D01*             X670Y305D1*
          X00700Y00305D01*             X700Y305D1*
Without zero suppression 48 bytes are used. With leading zero suppression 33 bytes are required to represent the same information. In the days of paper tape this was a very significant reduction. Depending on the data you might be better off leaving the leading zeros on and suppressing the trailing zeros.
           No Zero                   Trailing Zero
          Suppression                  Suppression

          X00560Y00320D02*             X0056Y0032D2*
          X00670Y00305D01*             X0067Y00305D1*
          X00700Y00305D01*             X007Y00305D1*
To correctly interpret the data you must count from the left side of the number to locate the decimal point. Confusing? Yes. |
|
Modal Data Coordinates After eliminating the decimal point and suppressing the redundant zeros you might think that the database designers would rest on their success. Not at all. One sharp eyed programmer noticed that the same coordinate would appear over and over again when the table moved only along X or Y. "Why not remember the last value of X and Y; output a coordinate only if it changes!"
          All Coordinates             Modal Coordinates

          X560Y230D2*                    X560Y230D2*
          X670Y305D1*                    X670Y305D1*
          X700Y305D1*                    X700D1*
The concept that the plotter remembers the last value of coordinates is called modality. PC boards often have hundreds of pads in a row along X or Y and a properly sorted Gerber file will be much smaller when the redundant coordinate is eliminated. This is such a fundamental concept that coordinate data is always modal. You don't need to inform your target site that data is modal or nonmodal - every photoplotter and CAM software supports modal data. In this example an additional 4 bytes were save by using modal coordinates. Commands can be Modal Modality is a good concept for data and works equally well for commands. For example, if you have a string of draw commands why repeat the D01 command again and again. Let it stay in effect until another command (D02 or D03) occurs to change it.
          D1 not modal                    D1 modal
          X560Y230D2*                   X560Y230D2*
          X670Y305D1*                   X670Y305D1*
          X700D1*                       X700*
          X730D1*                       X730*
          X760D1*                       X760*
          Y335D1*                       Y335*
It would appear that all commands in Gerber ought to be modal. Once issued the command is in effect until otherwise superseded or turned off. However there are a couple of erratic exceptions that occasionally cause trouble. The most curious is the D03 flash command. Certain brands of photoplotters don't treat D03 as modal. That is, they expect to see D03 at the end of each flash command. We've encountered this on MDA's FIRE 9000 family of photoplotters. Flashes that were displayed on our CAM software didn't appear on the film. The problem is easily solved by re-outing the Gerber data with explicit D03's - Lavenir has a utility that does this and many CAM software's can be configured to treat D03 as either modal or non-modal. The other erratic exception to the standard modal behavior of commands is the G02/G03 command - circular interpolation. Many photoplotters revert to G01 (linear) after a G02/G03 (circular). |
|
Gerber photoplotters can draw arcs when instructed to do so. In the past,
circular commands were rarely used for PCB manufacturing. Flex circuit boards
use curved traces to reduce stress, and high speed logic uses uses smooth radii
to reduce signal reflection. There is renewed interest in reading and writing Gerber
data with arcs and few rude surprises are surfacing. The basic format for circular interpolation is: |
GNN XNNNN YNNNN INNNN JNNNN DNN * Example: G02X40Y30150J0D01* |
|
Where G02 indicates clockwise rotation, G03 indicates counterclockwise rotation and G75
turns on full 360 degree circular. I,J are additional coordinates required to locate
the center of the arc. G02 and G03 commands are rarely treated as modal It would take more room available in this paper to properly treat the various permutations that can occur. Circular commands may be limited to just quadrant data on older machines or can describe full 360 degree arcs on newer machines. The meaning of I, J changes depend on whether data coordinates are absolute or incremental. Popular CAM programs don't always display or edit circular commands correctly. If you wish to test your CAM software, we have provide some text files on diskette. Test your software in advance. Don't wait until you're up against a deadline.
|
| We've seen that the Gerber file itself lacks critical information such as data format, units and information about whether the leading or trailing zeros have been suppressed. Nevertheless, a savvy photoplot operator can deduce parameters by viewing the data on a CAM station and adjusting the values until the display looks reasonable. The Gerber file is still missing data that even the most experienced operator can not guess at. | This is the description of what is contained in each aperture position. The actual D-code in the Gerber data only refers to a position on the wheel. It says nothing about what is contained in that slot. The designer has to hand over to the photoplot operator a complete description of what each D-code (aperture) looks like. This description is called the aperture list. |
Rule 3.
A Gerber file is not complete without an accompanying aperture list.
Without the aperture list, you have nothing!
What can an Aperture Look Like?
| There is no theoretical limit on what each aperture can look like. Apertures for vector plotters are made from a piece of film. Whatever can be exposed on film can be used as an aperture. Practically speaking, there are a half dozen common shapes that represent 90% of all the work done. Since these shapes are commonly agreed upon, you can pass this information to the photoplot operator in tabular form. |
| Complicated apertures need to be described in detail. A drawing of the aperture with coordinates is appropriate. Failure to precisely describe the desired shape results in bad film. A common custom aperture often mangled is the thermal relief pad. PCB fabricators are very particular about the details of the thermal relief , and will reject a film if the thermal relief design does not conform 100% to their specification. |
Photoplot File Headers
|
Why can't we put all these essential pieces of information into the Gerber file now that the memory
and media no longer limit the number of bytes? You can put in a header and almost every photoplotter
can read a header. The problem lies in standardization. Gerber's RS274X format with an embedded header was not popular enough to establish itself as a defacto standard until the late 90's. Each photoplotter manufacturer and each independent CAM software developer use a different internal database to express format, unit and aperture information.
|
Even different members of Gerber's family of photoplotters support different parameters in the header.
If 10 photoplotters and 10 independent CAM developers each use a different format, the odds that any one
header you put into your Gerber files will be readable by both the CAM software and the photoplotter are
1 in 100. It's too late until the IPC-350 standard becomes widely used to resolve this header problem.
Until then, the safest approach is to create a form on paper, and in a machine readable format, properly
documenting your files.
|
Below are two sample header files, and a plain text interpretation.
Header for MDA's FIRE 9000 Photoplotter |
Header for Gerber Model 4X00
% FSLAX44Y44* ADD10C,.025* ADD11C,.030* ADD12C,.030X.010* ADD13R,.030X.030* ADD14R,.020X.100* ADD17P,.040X8* % |
Plain Text Meaning |
| Rule 1. When you send a Gerber file, always provide the data format. When you receive a Gerber file, always ask for the data format. |
| What if your customer violates Rule 1 and sends you a Gerber file with no data format information? You're working graveyard shift, it's 11pm and you need to plot the film by 8am the next morning. Make an educated guess. There are five digits in the coordinates so that the sum of integers before and after the decimal point must equal 5. The most likely candidate is 2.3. | Why? Not many boards are longer than 99 inches and not many boards are built to a precision less than 0.001 inch these days. Display the board on your CAM station. If the overall size looks good (say 8 inches) go ahead. If the board shows up as 80 inches or 0.8 inches long you are probably off by a factor of 10 in one direction or the other. |
| Leading to Rule 2: Rule 2. When you send a Gerber file, always indicate leading or trailing zero suppression. When you receive a Gerber file, always ask about leading or trailing zero suppression. |