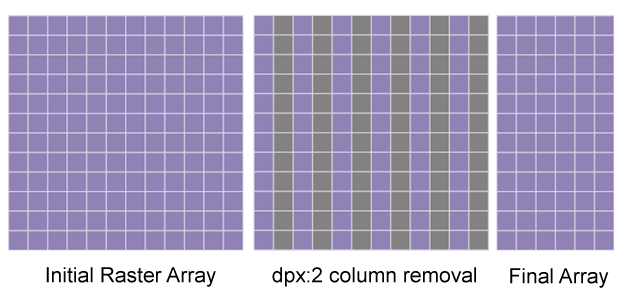
Normally when rasterizing a Gerber file, the resolution along X and Y are the same since the output device's pixels are square or round.
GBR_RIP includes the ability to specify different scales in X and Y but this is normally used to correct for very slight distortions due to substrate stretching or other machine imperfections. This means that the difference in X and Y scales is very small. Such scaling is done on the input vector data.
What if our equipment requires a large difference in X and Y scale? For example, suppose each pixel on our machine is twice as wide as it is high? In that case we may need the rasterizer to produce twice as many pixels in Y as in X so that the final output looks correct.
We find that this is most effectively implemented by oversampling and then removing rows or columns of pixels after rasterizing. The command line options dpx: and dpy: activate the row/column removal.

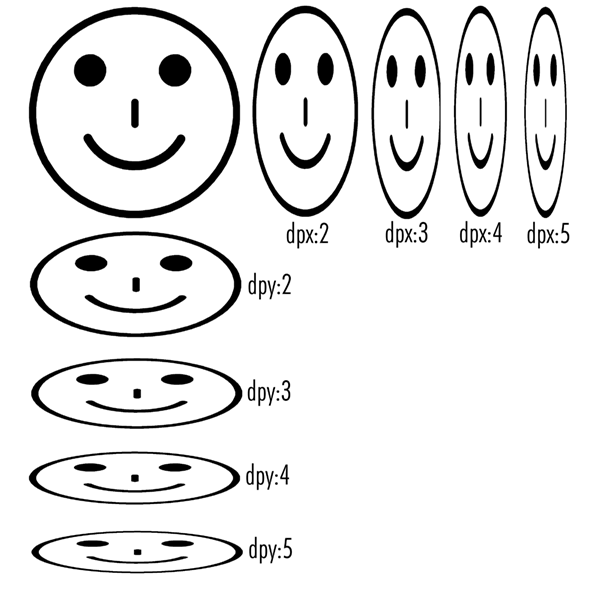
If columns are removed, the image is "squashed" along X; if rows are removed the image is squashed along Y. Due to the nature of the TIFF file, it is much faster to remove rows than columns. Various settings are shown below on the "happy" face image. [ hface.gbr 10KB RS247X file.]

Command Line Syntax
The pixel scaling is controlled via a command line option. The options -dpx:N and -dpy:M can be used in addition to existing command line options. Both options can be used simultaneously if desired.
Command Line Examples
The images above were created using the Gerber file hface.gbr and the gbr2tiff.exe with the following command line options:
No pixel scalinggbr2tiff.exe hface.gbr -274x -mm -aw -dpi:4000 -pack:normal.tifScaling Along X
gbr2tiff.exe hface.gbr -274x -mm -aw -dpi:4000 -dpx:2  -pack:dpx2.tif
gbr2tiff.exe hface.gbr -274x -mm -aw -dpi:4000 -dpx:3  -pack:dpx3.tif
gbr2tiff.exe hface.gbr -274x -mm -aw -dpi:4000 -dpx:4  -pack:dpx4.tif
gbr2tiff.exe hface.gbr -274x -mm -aw -dpi:4000 -dpx:5  -pack:dpx5.tif
Scaling Along Y
gbr2tiff.exe hface.gbr -274x -mm -aw -dpi:4000 -dpy:2  -pack:dpy2.tif
gbr2tiff.exe hface.gbr -274x -mm -aw -dpi:4000 -dpy:3  -pack:dpy3.tif
gbr2tiff.exe hface.gbr -274x -mm -aw -dpi:4000 -dpy:4  -pack:dpy4.tif
gbr2tiff.exe hface.gbr -274x -mm -aw -dpi:4000 -dpy:5  -pack:dpy5.tif
where
gbr2tiff.exe    the gbr_rip executable
hface.gbr       the input gerber file
-274x           indicates input is RS274X
-mm             indicates input is in mm
-aw             auto calculation of data extents
-dpi:4000       the nominal dots per inch
-dpx:N          scale down along X by factor of N (column removal)
-dpy:M          scale down along Y by factor of M (row removal)
-pack:file      output using packbits compression to this file name.
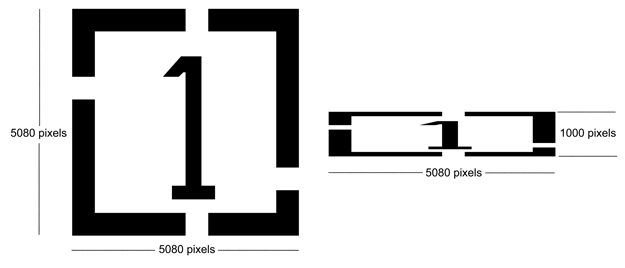
Because pixel scaling is done on the intermediate rasterized data it is possible to combine gbr_rip's vector scaling and pixel scaling together. For example, suppose your application requires a DPI of 5080 along X but only 1000 along Y. If you set the resolution using -dpi:5080 and pixel scaling using dpy:5 then you have an effective DPI along Y of 5080/5 = 1016.
To get your exact scaling, first figure the additional 1000/1016 ratio (0.98425) and then use the -scale option with values: -scale:1,0.98425 which will result in the desired ration of 5080/1000.
Reference [No scaling]gbr2tiff.exe onebyone.gbr -274x -inch -aw -dpi:5080 -scale:1,1 -pack:onebyone.tifMixed Scaling (vector/pixel)
gbr2tiff.exe onebyone.gbr -274x -inch -aw -dpi:5080 -scale:1,0.98425 -dpy:5 -pack:mixed.tif
You can see the results using the input file onebyone.gbr which is exactly 1 x 1 inch showing the unscaled raster image (onebyone.tif) on the left with the scaled raster image (mixed.tif) on the right.
