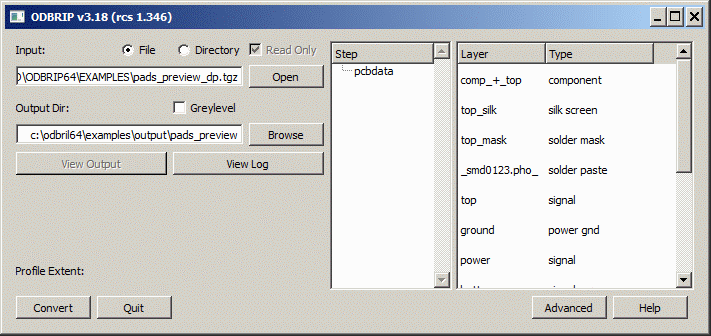

We supply a simple GUI (w. source code) for ODBRIP that can be used both to test the RIP and as an example of how to call and use the odb_rip library. You can use the GUI by double clicking on the odbrip64.exe entry.

Input - select whether you are opening a .tgz file (File) or a directory structure (Directory). Then click on the Open button to get to a file browser and select your ODB++ data.
If you check Read Only for the Directory option, thenOutput Directory - Select the output directory where the raster files will be saved (Temporary working files also are written to this directory.)
Greylevel -If you have selected GreyScale, the layers selected in the main dialog will get merged into an output. This is a very special feature and not normally checked.
Step - after selecting the desired ODB++ data, the program will scan the file and display a list of steps and layers. An ODB++ file will contain, at a minimum, one step. However it could contain many steps and it is the user's job to select the desired one for ripping. The "top level" step is selected by default.
Layers - after scanning the ODB++ data, the program will display the various layers found in the data. Each layer has a type associated with it which is also displayed. The user can select one or more layers to rasterize. Note: just because a layer appears in this list is no guarantee that the layer contains any data.
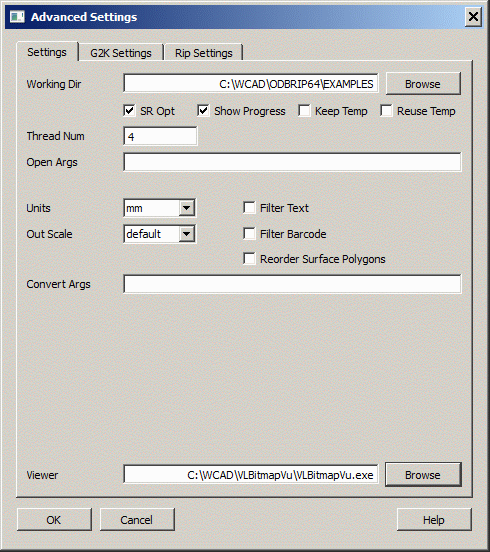
The advanced dialog is use to control a wide variety of RIP settings. Controls are divided into 3 dialogs:

Working Directory - specify the working directory where temporary files are written.
SR Opt - Optimizes step repeat, where the software combines SR child steps together when possible. This is the default behavior. There is an option to turn it off because sometimes child steps overlap each other and combining it might produce an error with scratch data.
Show Progress - If checked, a progress bar is displayed during conversion.
Keep Temp - if not checked, all temp files are erased at the end of the job. If checked they are not erased. Generally there is no reason to keep the temp files unless you are debugging a problem.
Reuse Temp - When checked, the tool will not re-convert the ODB++ STEP/LAYER in the event the same STEP/LAYER pair need to be re-rasterized using a different window, DPI etc.
Thread Number - enter the number of concurrent threads for the rasterizer. This should not exceed the number of hyperthreads available on your hardware. For example, if you have two CPU cores and they each support 2 hyperthreads then you can set this parameter = 4. Exceeding 4 is not useful.
Open Args - additional command line arguments (used during the opening of the ODB++ data)
Units - select inch or mm.
Out Scale - There are several options available:
default - ignore all out_scale
"out_scale" attribute : Ignored
"out_x_scale" attribute : Ignored
"out_y_scale" attribute : Ignored
%SF directive : Not used
The shape of feature with "out_scale" attribute : Not scaled
The position of feature with "out_scale" attribute : Not scaled
sf - enforce global scaling by way of %SF
"out_scale" attribute : Ignored
"out_x_scale" attribute : Not Ignored
"out_y_scale" attribute : Not Ignored
%SF directive : Used
The shape of feature with "out_scale" attribute : Not explicitly scaled
The position of feature with "out_scale" attribute : Not explicitly scaled
scale - enforce global scaling by way of explicit scaling
"out_scale" attribute : Ignored
"out_x_scale" attribute : Not Ignored
"out_y_scale" attribute : Not Ignored
%SF directive : Not used
The shape of feature with "out_scale" attribute : Not
scaled The position of feature with "out_scale" attribute : Explicitly scaled
local - perform scaling with .out_scale control
"out_scale" attribute : Not Ignored
"out_x_scale" attribute : Not Ignored
"out_y_scale" attribute : Not Ignored
%SF directive : Not used
The shape of feature with "out_scale" attribute : Not scaled
The position of feature with "out_scale" attribute : Not scaled
Filter Text - Filters out text that would otherwise appear in the output.
Filter Barcode - Filters out barcode symbols that would otherwise appear in the output.
Convert Args additional command line arguments.
Viewer - Specify the path/program name to launch in order to view the raster files. If it's not specified, you will be prompted to select a viewer when you try to view the output.

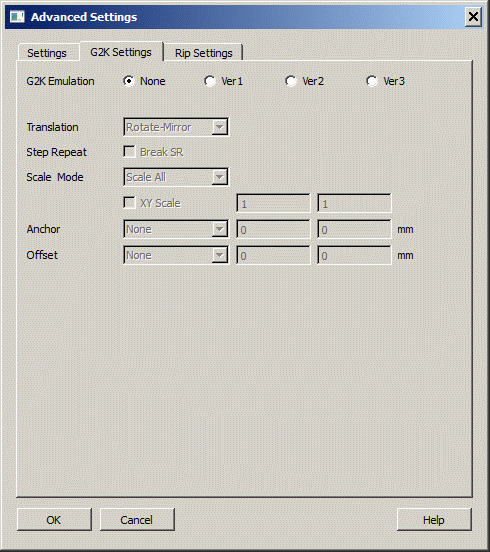
G2K Emulation
Most users should select None. The other 3 emulations were created for a specific client who required control of a specific range of photoplotters.
Ver1
allows the user to perform Scale, Rotation, and Mirror based on Anchor Datum set to the Profile Center.
does not allow the use of SF, IR, MI, IP, IO commands in the output Gerber file.
assumes that mirror occurs before rotation.
Ver2
similar to Ver1 but does not break STEP and REPEAT.
Ver3 - has additional transformation options enabled.
Translation - No Mirror - Don't perform mirror during the conversion.
Translation - Rotate Mirror - Perform rotation first and then mirror.
Translation - Mirror Rotate - Perform mirror first and then rotation.
XY Scale - User can define a different scale along X and Y.
Anchor - User defined anchor point for the scaling.
Offset - User defined offset along X and Y.

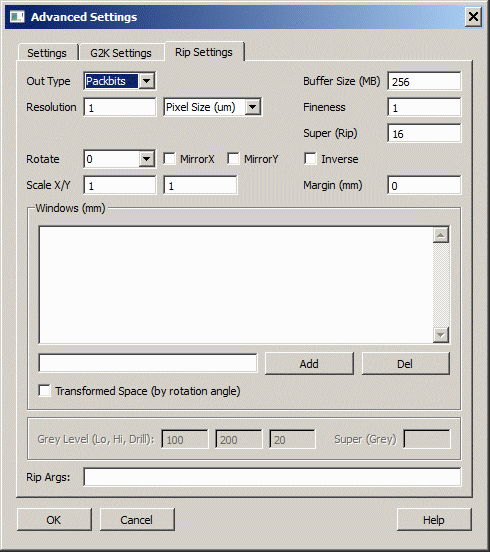
Output Type - Selected output bitmap formats: Packbits (compressed TIFF), TIFF (uncompressed), BigTiff and BMP.
Resolution - Pixel size resolution in microns, DPI (dots per inch) or DPM (dots per meter)
Rotate - Rotate image by user defined value in degrees
Mirror X - Mirror output along X axis
Mirror Y - Mirror output along Y axis
Scale X/Y - Scale data by X and Y in the x and y directions respectively (default: X = Y)
Buffer Size - Raster buffer size in MB
Fineness - Fineness controls the arc resolution in conjunction with the specified DPI. The larger the value of the fineness multiplier the coarser the arc.
Super Rip sets the grayscale output.
Inverse - Output image polarity is reversed (bits are flipped)
Margin - Provide a border of X mm
Windows - Rasterize data in the window from x0,y0,,x1,y1(LL to UR) - user can define multiple windows.
Grey Levels (Lo, Hi, D) - specify minimum grey value to be L, maximum value to be H, and that of drill files to be D (only valid for -super:16). Only available if GreyLevels is checked in the main dialog
Super(Grey) - Super sample the output using one of the options below:
-super: [ 2 | 4 | 8 | 16 ]
super sample output
or
-super:18
monochrome TIFF or BMP but using 8 bits per pixel.
or
-super:28
super sample output 2x2 and each byte corresponds to one pixel (-tiff). -super:2, each byte contains 4 pixels.
or
-super:48
super sample output 4x4 and each byte corresponds to one pixel (-tiff). -super:4, each byte contains 2 pixels.
Rip Args - Additional arguments used during the rip process